In June I started a challenge for my FFB members and we just completed it this month. I gave them 9 challenges along with other additions like scavenger hunts through FFB, "Name that quote", "First one to answer this question," etc.
I challenged them to try out new products, methods and tools - it's easy to get stuck in a rut and not reach beyond ourselves. I'm very pleased at the results! They were all good sports and really pushed themselves to experience new things including their interaction with our community. It's been a fun ride and I'm planning my next set of challenges for after enrollment closes in September.
If you'd like to join us on Furniture Flipping Blueprint and Facebook FFB PRO, enrollment is open just a few times a year. To be notified when enrollment opens, hop on my newsletter list: Furniture Flipping Newsletter. You will also get a pdf of the 4 most used homemade chalky type paint recipes.
Here are spotlights on a few my members who participated in the challenges:

Jessica Johnson
"A few months ago I resigned from my job of 10 years to restore and flip furniture full time, but it really started five years ago.
That was when I saw a couple of gorgeous chairs on the side of the road and much to the horror of my teenage daughters, I flipped my car around and scooped them up and that is how my big furniture flipping adventure began. Granted I had always picked up second hand furniture for all 3 of my children’s rooms and painted it to whatever their latest request was. We went from ballerinas to peace signs to splatter paint.
My daughters who are 18 and 20 now love and brag about what I do. My 14-year-old son is just happy I am now home, so he doesn’t have to catch a bus before the sun comes up. My husband….well, he thinks I’m a little nuts but supports all of my crazy and will even pick up roadside finds upon request"! ~ Jessica Johnson
BEFORE

AFTER
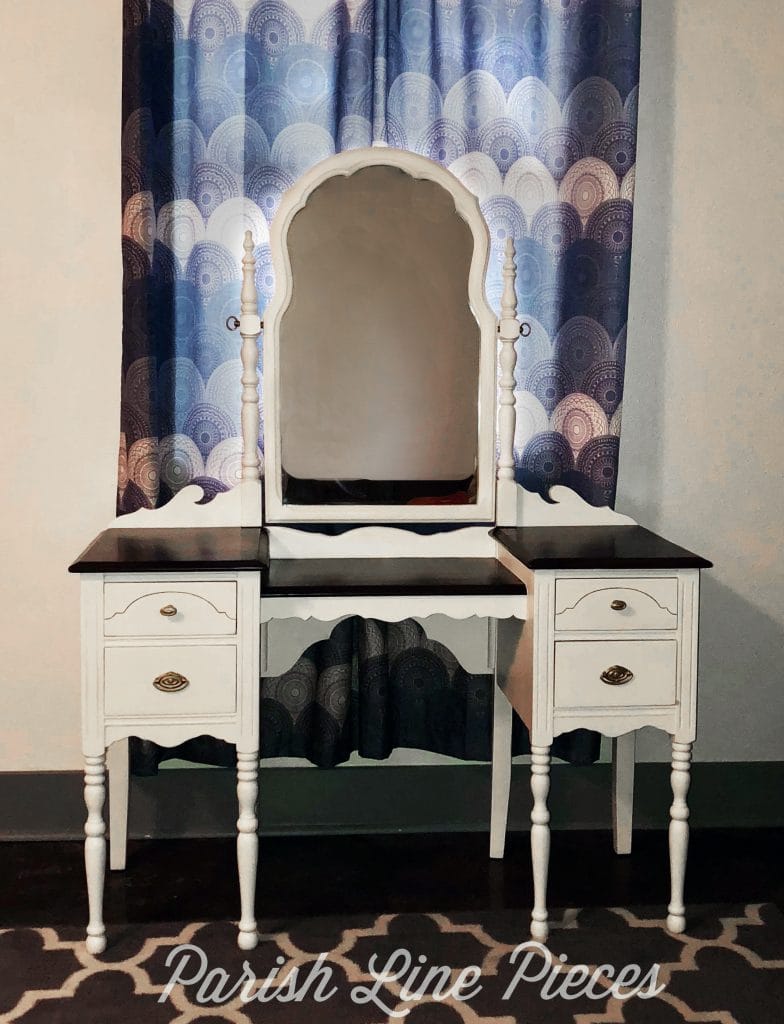
"A little history on the vanity. - it was my customers childhood vanity but had belonged to her granny before that, so she wasn’t sure of the age. When she had it, it was painted pink but currently it was a turquoise blue color with a ton of peeling paint.
She wanted it painted an antique white and the swivel mirror in working order to be able to hand it down to her grandchildren. Do you know how nervous this made me? I can’t even begin to describe it, I just knew I was going to drop and break that mirror."
Jessica Describes Her Process
- My 3 biggest issues were the amount of old paint, blistering veneer, non-functioning swivel mirror. I started with the paint. I decided to strip it down because the layers of paint were so thick I didn’t think sanding it down would cut it. I used Jasco brand paint remover and I had to use several applications to get most of the paint off.
- That was when I decided to ask my customer if she would like to bring the top back to a wood finish. I was so excited when she agreed! It is my favorite look. While stripping the paint off I found some original artwork on the front of the vanity, little painted flowers. I felt like I had found a hidden treasure!
- For the top I used a Min-Wax gel stain in Walnut and Benjamin Moore Advance in Cameo.
- My next issue was the bubbling veneer on both sides of the vanity. I tried 2 different processes to remedy them. First, I cut slits in to the bubbles and used the hot iron method, failure.
- Next, I took a razor knife and cut the blisters out and then filled them with wood filler, failure. This could have passed and would probably have lasted but I could feel the unevenness and that drove me crazy.
- In the end I covered both sides with a new piece and it looked and felt flawless!
- My last issue was fixing the swivel mirror. I reluctantly removed the mirror from its frame, so I could clean all the old paint off and get the old hardware out of the frame. It was then that I found the date stamp on the back of the mirror:
- 1927. Very cool! I put all the painted hardware into a pan with baking soda and simmered it for a couple of hours. All the paint pretty much melted off.
- I used Brasso to polish them.
- The knobs for the top drawers looked great but the pulls for the bottom drawers lost some of their original brass color. Rub-n-buff to the rescue. I found a color that matched the knobs perfectly.
- Unfortunately, I had to order new hardware for the mirror since one of the bolts was bent. Rockler Woodworking had what I needed.
- I was nervous about securing that mirror onto the vanity, it was a first for me. With a couple extra screws and a few shims, I got the 2 side support pieces on and level, and while holding my breath I screwed the mirror in. I was never so happy as I was when that part was complete and successful!
"My customer was beyond happy with the outcome. Seeing her reaction was worth the few extra steps I put into it. My hope is that the time and energy I put into this vanity will enable it to last another 91 years!" ~ Jessica Johnson

Beverly Watson
"I started out a year ago restyling my own furniture to update our guest room. I wanted to use pieces given to me by my grandparents, which didn't fit our style and had been stored in our barn. I enjoyed the process, was amazed at the results and was hooked.
Next, I wanted to help the young people in my family as they started out on their own. All the while I was researching, learning different techniques and improving my skills. I want my pieces to last for generations, so quality and durability is key for me.
I sold my first pieces 8 months ago. I have a full time career apart from restyling furniture, but I make time everyday to do something with my furniture. I also work on it every weekend. I truly enjoy restyling and I'm excited to work on each piece. It's relaxing for me to create after coming home from my high stress corporate job. I enjoy learning, trying new techniques, the artisan community and the friendships I've made along the way." ~ Beverly Watson
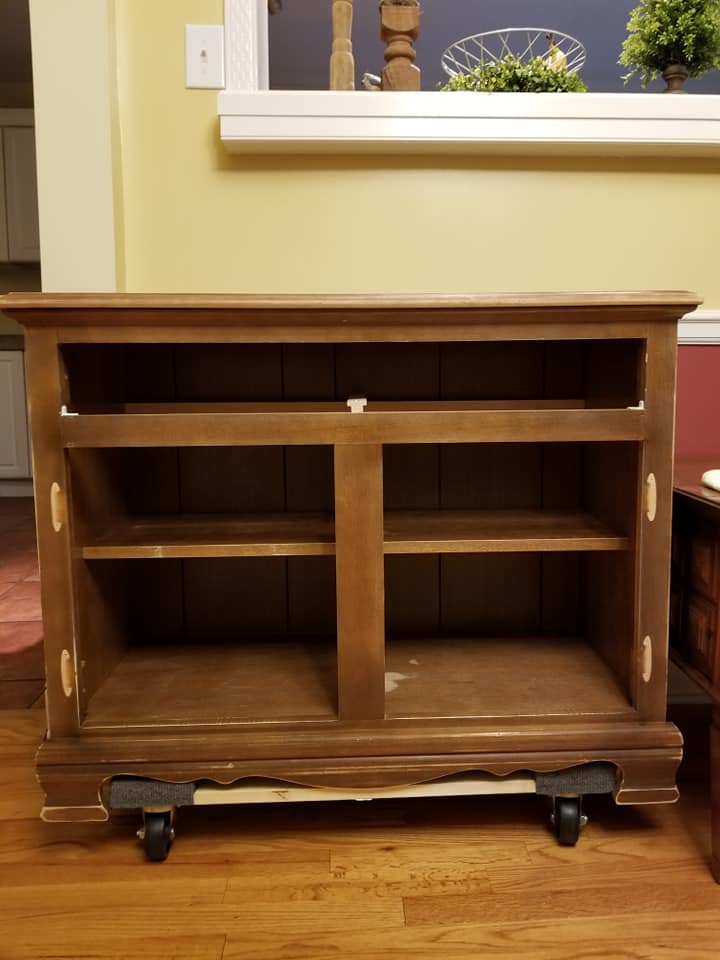
BEFORE
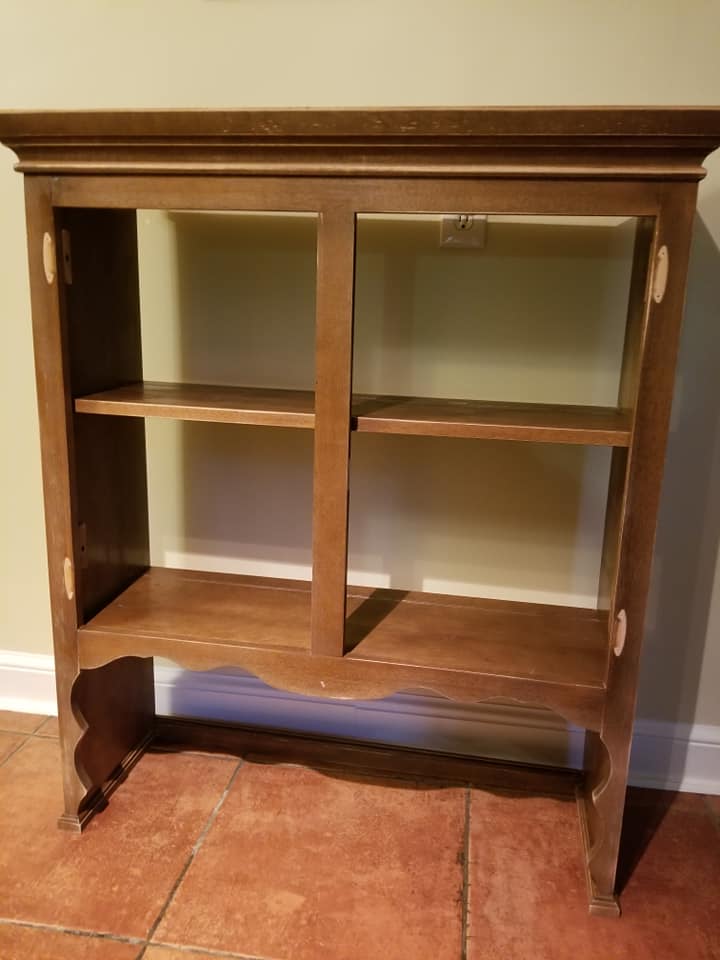
AFTER
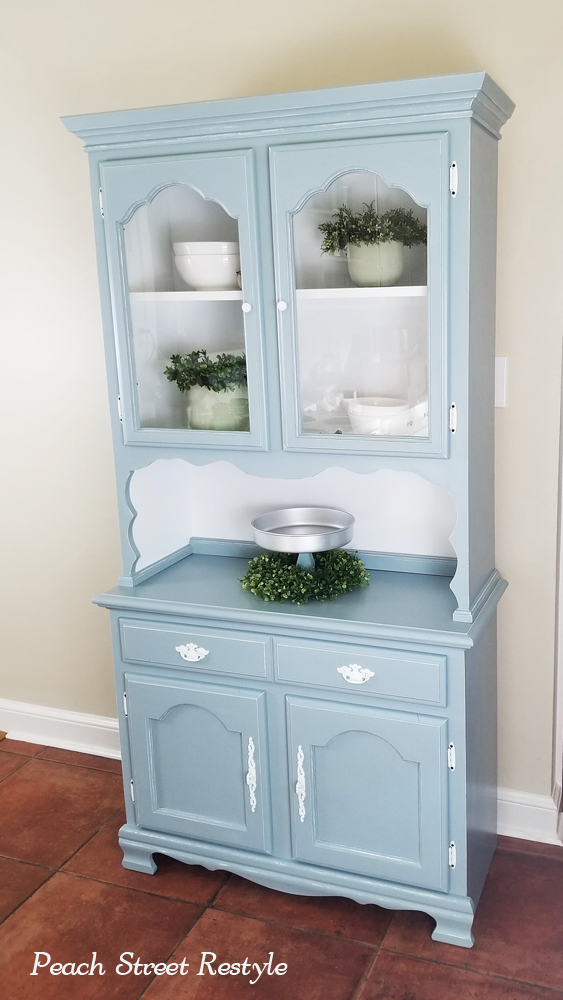
Beverly Describes Her Process
I used the following products:
TSP to clean
BIN Shellac Primer
Dixie Belle Savannah Mist and Cotton
Wise Owl Furniture Salve on the drawer
These are the steps:
- I cleaned the hardware by soaking it overnight in ketchup.
- I then applied Rustoleum Spray Paint White Satin and Rustoleum Matte Clear Enamel.
- I used a new tool to remove the back of the hutch: an Arrow stapler puller, which was easy to use and worked great.
- The backer board was brittle and chipped, so I bought a poplar plywood board to replace it with. My husband cut it to fit.
- I used BIN Shellac Primer and Rustoleum White Satin Spray Paint on the back.
- I sealed everything, except backer board with Minwax Polycrylic.

Lori Yashko
"A little over a year ago a woman opened a cute brick and mortar store in the small town in Georgia where we spend our summers. We quickly became friends and I loved her store and style! When she originally planned to open the store she had a partner but the woman backed out at the very last minute. I partnered with her and learned all about Fusion Mineral Paint.
She held classes and I participated both as an owner and a student. I found I loved painting furniture and creating something new from something old. I learned many techniques from her. Unfortunately she and her husband decided to move 2 1/2 hours away so we closed the store and dissolved the partnership.
I continued to paint pieces in my home. She is still a mentor for me. I also took classes from another woman who sold FMP and continued to learn. I have also taken several classes via Facebook (Val's has been the most fun in Furniture Flipping Blueprint).
FFB has been a great place to learn, ask questions, watch others as they try new techniques (and learn from them) and generally just have fun! I love the monthly challenges as it nudges me to get out of my comfort zone and try new techniques. And with guidance provided if needed! I am now comfortable with opening my own booth, which I will be doing in the fall as soon as space becomes available."
BEFORE
AFTER

Lori Describes Her Process
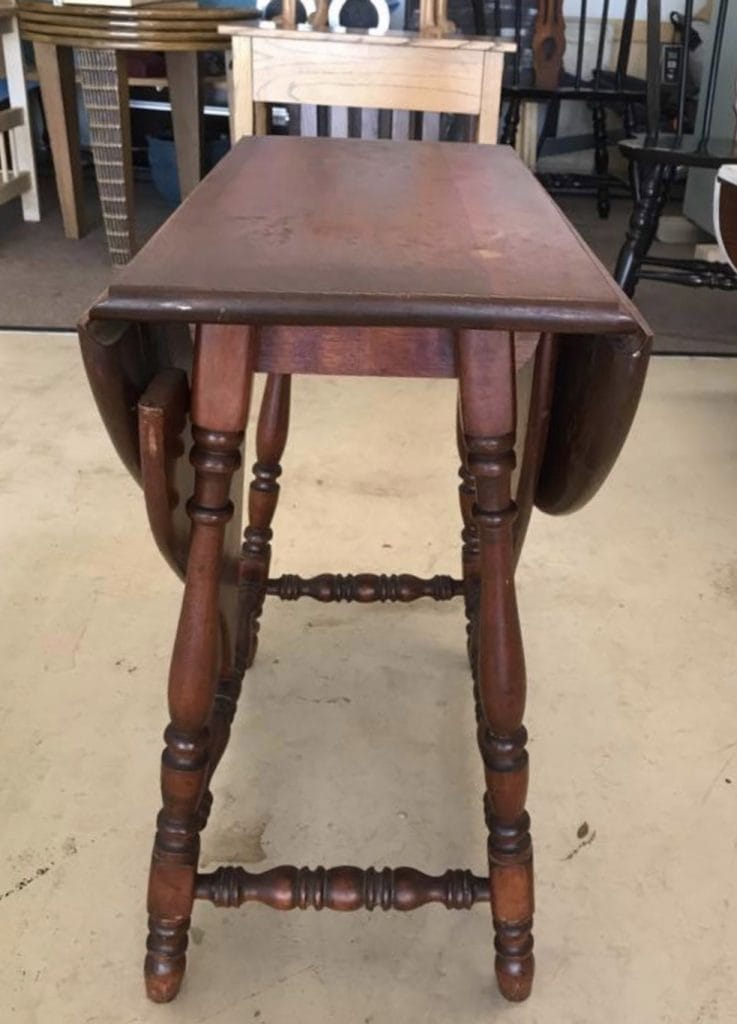
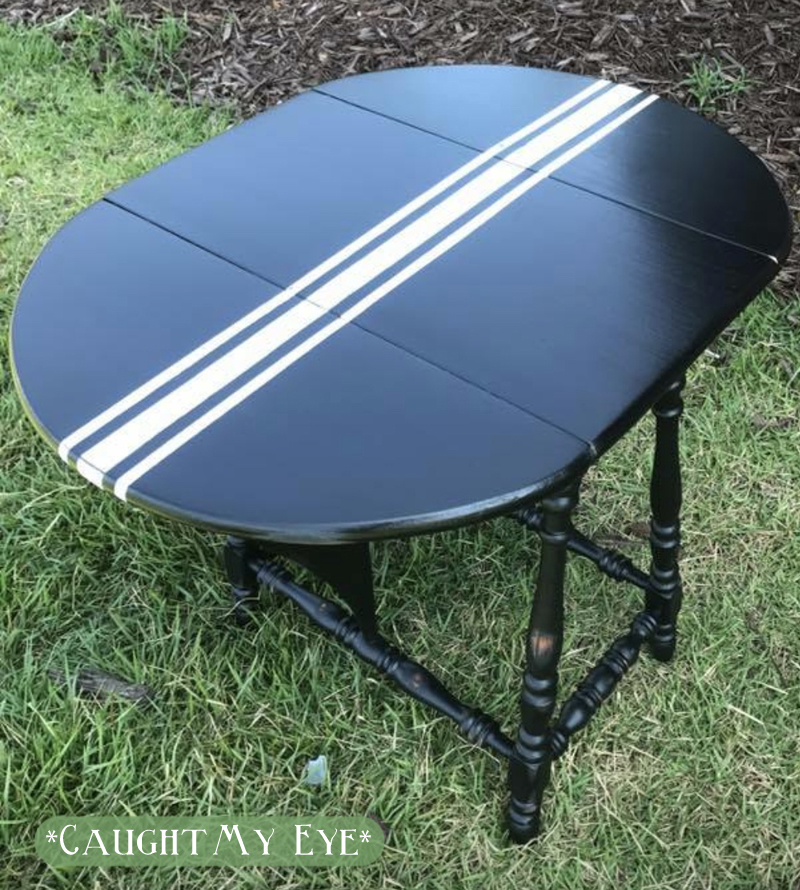
These are my before and after pictures of a little drop leaf table I did for the August challenge in Furniture Flipping Blueprint PRO group.
This table was old but in good shape for the most part. These are the steps I took:
- I took it all apart to sand it (used 80 grit) and cleaned it with Krud Kutter. It had years of yucky build up.
- I then painted two coats of Fusion Mineral Paint Coal Black over the entire piece.
- I lightly sanded it to get it smooth (fine grit).
- To add the grain sack stripe I measured the wide strip to be 1" then placed blue painters tape down on each side of the 1" mark down the side of table.
- I painted 2 coats FMP Casement. (I would only do 1 coat in the future. 2 coats not necessary for the look I was going for).
- After drying I then measured 1/2" from wide stripe and placed 1/2" painters tape.
- I measured space 1/2" then added 2nd painters tape to follow. I did same thing on other side of wide stripe.
- This time I painted with Casement but only one coat.
- I distressed the stripes carefully not to touch the black. I used a sanding sponge at medium grit.
- I then sanded the legs and sides of table for a distressed look again using medium grit sanding sponge.
- I finished with 2 coats of polycrylic on the top to protect from glassware rings etc. Fusion Mineral Paint does not need a top coat but in this case I did add the polycrylic for added protection.


RoseMarie Brown
July FFB PRO Challenge Winner
"I am a lover of all things pretty - most especially my spaces around me.
I have spent most of my adult life chasing the corporate devil, all the while leaving my passions and artistic cravings carefully on a shelf until I could find short windows of time to enjoy them. Finally, my company downsized and after 15 years of being in a very intense workforce, my realization was more clear than ever. My only compensation was of monetary value and my own medical deterioration, which was the beginning of a scary future for myself and my family.
Funny thing though, while my company was giving their tearful layoff story, I was not upset or even worried about my next move as I knew God had a better plan. I received a severance that allowed me to do some much needed soul searching. While I was in this place, I painted a piece of furniture that had been in our family for nearly 65 years.
Once my family saw the transformation they all very thoughtfully encouraged me to consider starting my own business and leave the corporate world behind me. So by God’s grace and perfect direction, my health is better, I’m laughing more and life seems to be as it should be.
More time with family, my sweet husband and the introduction of a perfect little granddaughter. Our Sweet baby Lilly has given me a whole new set of eyes. So today I am embracing my passions full speed ahead.
I believe in the power of paint.....
A great cup of coffee in the afternoon.......
And no room is complete without a bouquet of fresh flowers ......"
BEFORE

AFTER

RoseMarie Describes Her Process
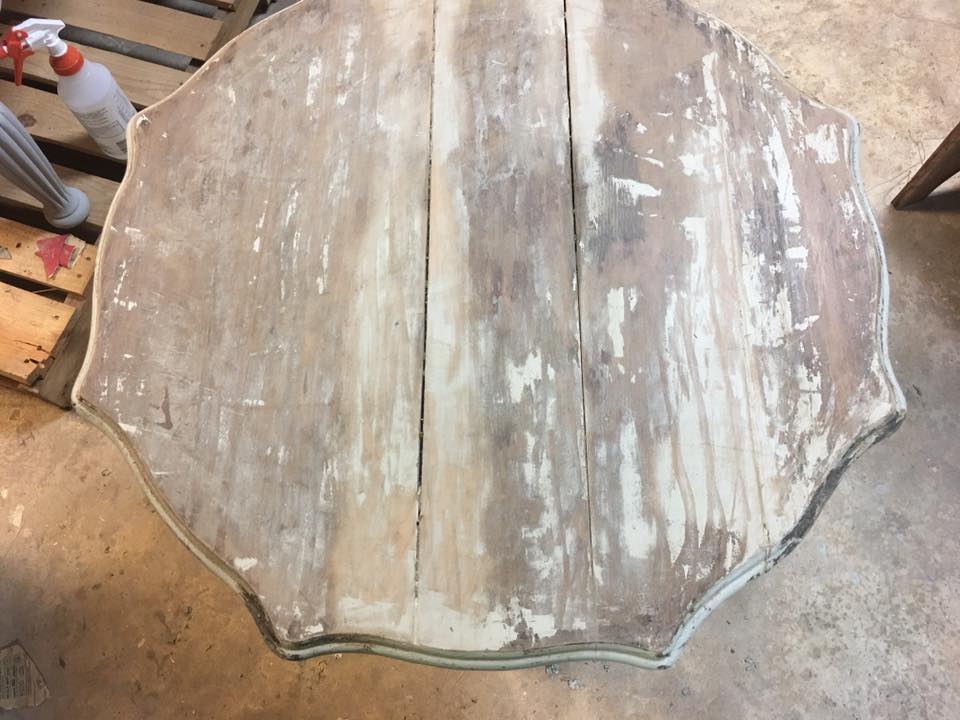
- I lined up the legs that were crooked which leveled it up.
- I replaced missing scroll piece.
- And then removed all the wood pieces underneath and lined up the gaps in the top.
- I removed 3 or more layers of paint with Jasco stripper which was first time using and sanded it smooth.
- And then used shellac on entire piece.
- I primed with STIX.
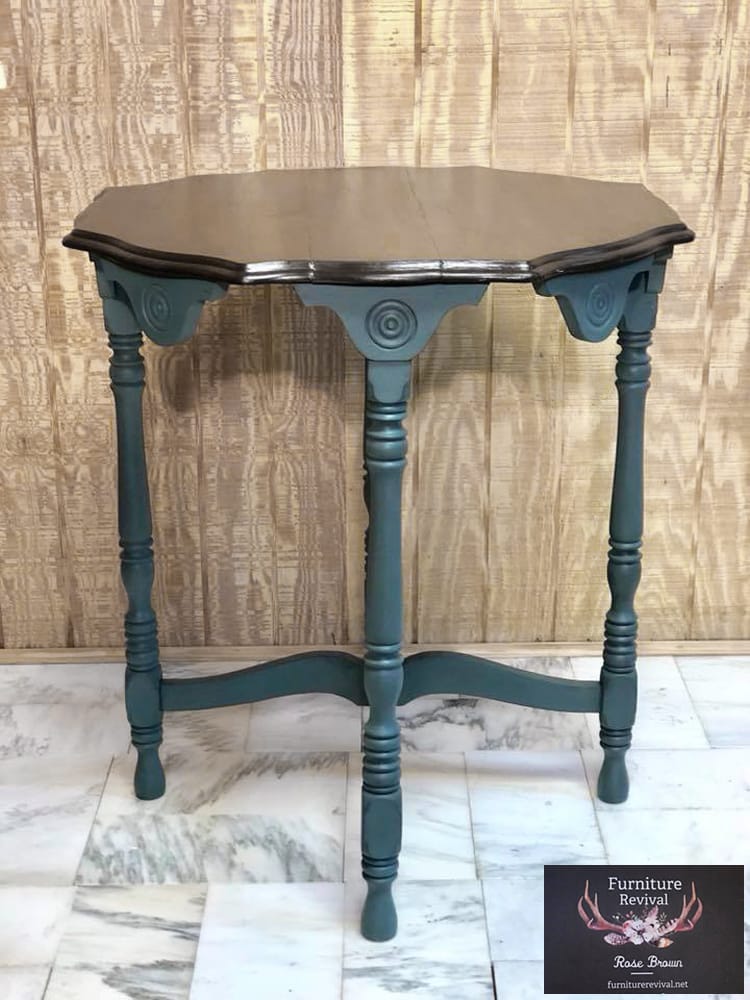
- Retique was added on the top (first time using).
- I stained the Retique It with Varathane stain on the top in Ebony.
- I used Crystalac polyurethane for a top coat.
- I then painted bottom half with Dixie Belle (Stormy Seas).
- I used Dixie Belle top coat in satin on the bottom half.
- I added Dixie Belle black wax on bottom half.

Cheryl Hunt

If you'd like to join our furniture flipping community, FFB, hit the button below! We are a group of like-minded artists that encourage and cheer one another on (and without pressure!) as we improve our skills and help one another enjoy the journey along the way.
Would you like to be a part of this thriving and challenging community? Join us!
BEFORE
AFTER

Cheryl Describes Her Process
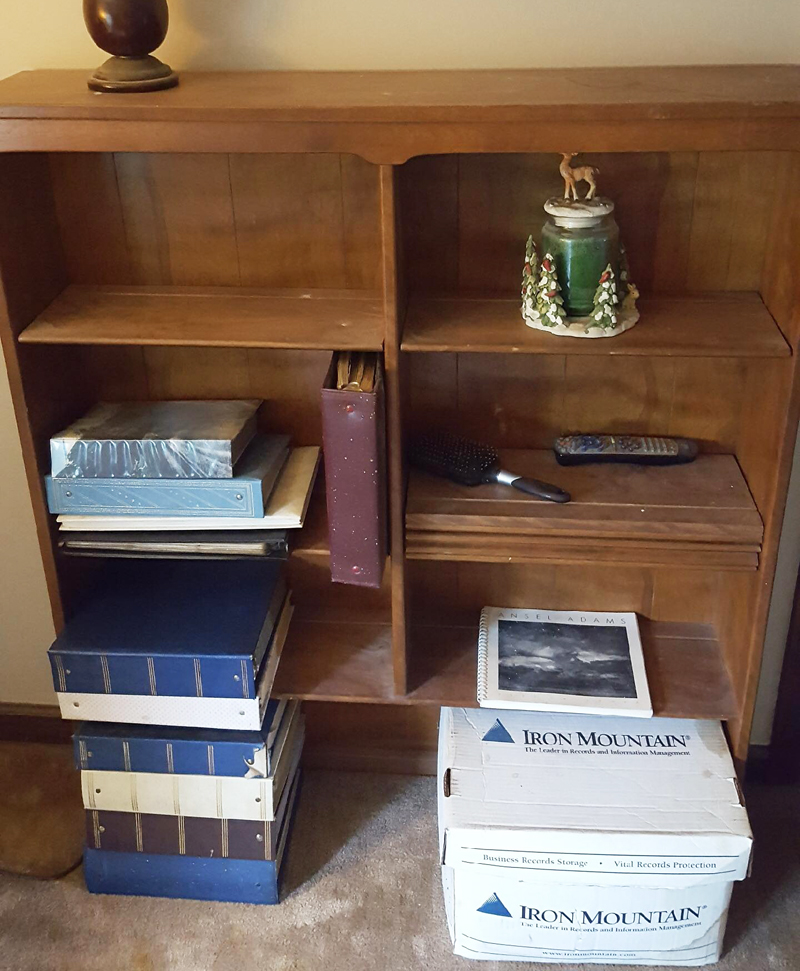
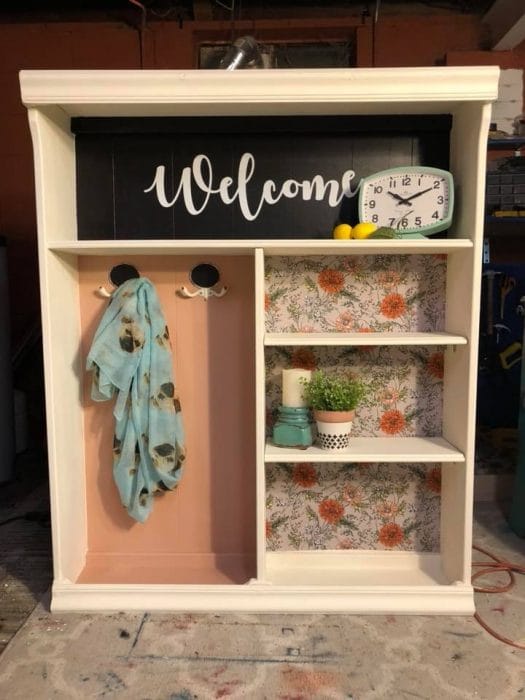
- I took a 70’s Ethan Allen desk hutch and flipped it upside down.
- I added a top and trim and painted the piece white, soft pink, and chalkboard black.
- The patterned section is decoupage fabric.
- I added shelves and hooks for organization purposes.
The result is a welcoming piece for an entryway or hallway.


Kimberly Cox
August FFB PRO Challenge Winner
"I have always painted and puttered around with old furniture. In the beginning it was out of necessity; later I found it fun and relaxing. About three years ago I started selling LuLaRoe online while working full time. I enjoyed it and was profitable for a while. For many reasons I decided to leave LuLaRoe after a year and a half. I found that I missed being busy! I work 40-60 hours a week at a full time job but the evenings and weekends were just BORING. My kids are adults and while two of them share house with us - they have their own lives. My husband has his own hobbies and I don't think its fun to just clean house all of the time. I finally had the room to work since our new home had a bigger garage so I started flipping. I was hooked after I sold my first piece for a $175 profit.
I work on my projects mostly on the weekends, since I work so late during the week. If I'm home I'm probably in the shop. I strongly encourage the other members of my family to be self sufficient and laundry cooking and cleaning is shared. I call my shop time my 'fill up the well time'. We all have a well inside of us that we fill with our peace, contentment, and patience. Day to day struggles work hard to empty that well, so we need to make sure that we take the time to fill it up again so that we can be the best person that we can be for our loved ones. Taking that time to fill my well makes me a better wife, sister, mother and friend. I find joy in the making and joy in providing extra $$ or special furniture pieces for my family - and that is why I'm a flipper.
I also have really enjoyed being a part of the and FFB and PRO community. It's great to have others to bounce ideas off of and it's a more personal 'how do you do this' than YouTube. I love that Val challenges us and pushes us to try new things. It's like having a personal trainer for your hobby/business!" ~ Kim Cox
BEFORE

AFTER


Kimberly Describes Her Process
1. First I cleaned with Krud Kutter.
2. And then stripped, chipped and scraped a very thick brittle poly finish off of the top with Jasco stripper.
3. I wiped it down with mineral spirits, sanded the top and scuff sanded the legs.
4. I painted the whole thing with STIX Bonding Primer.
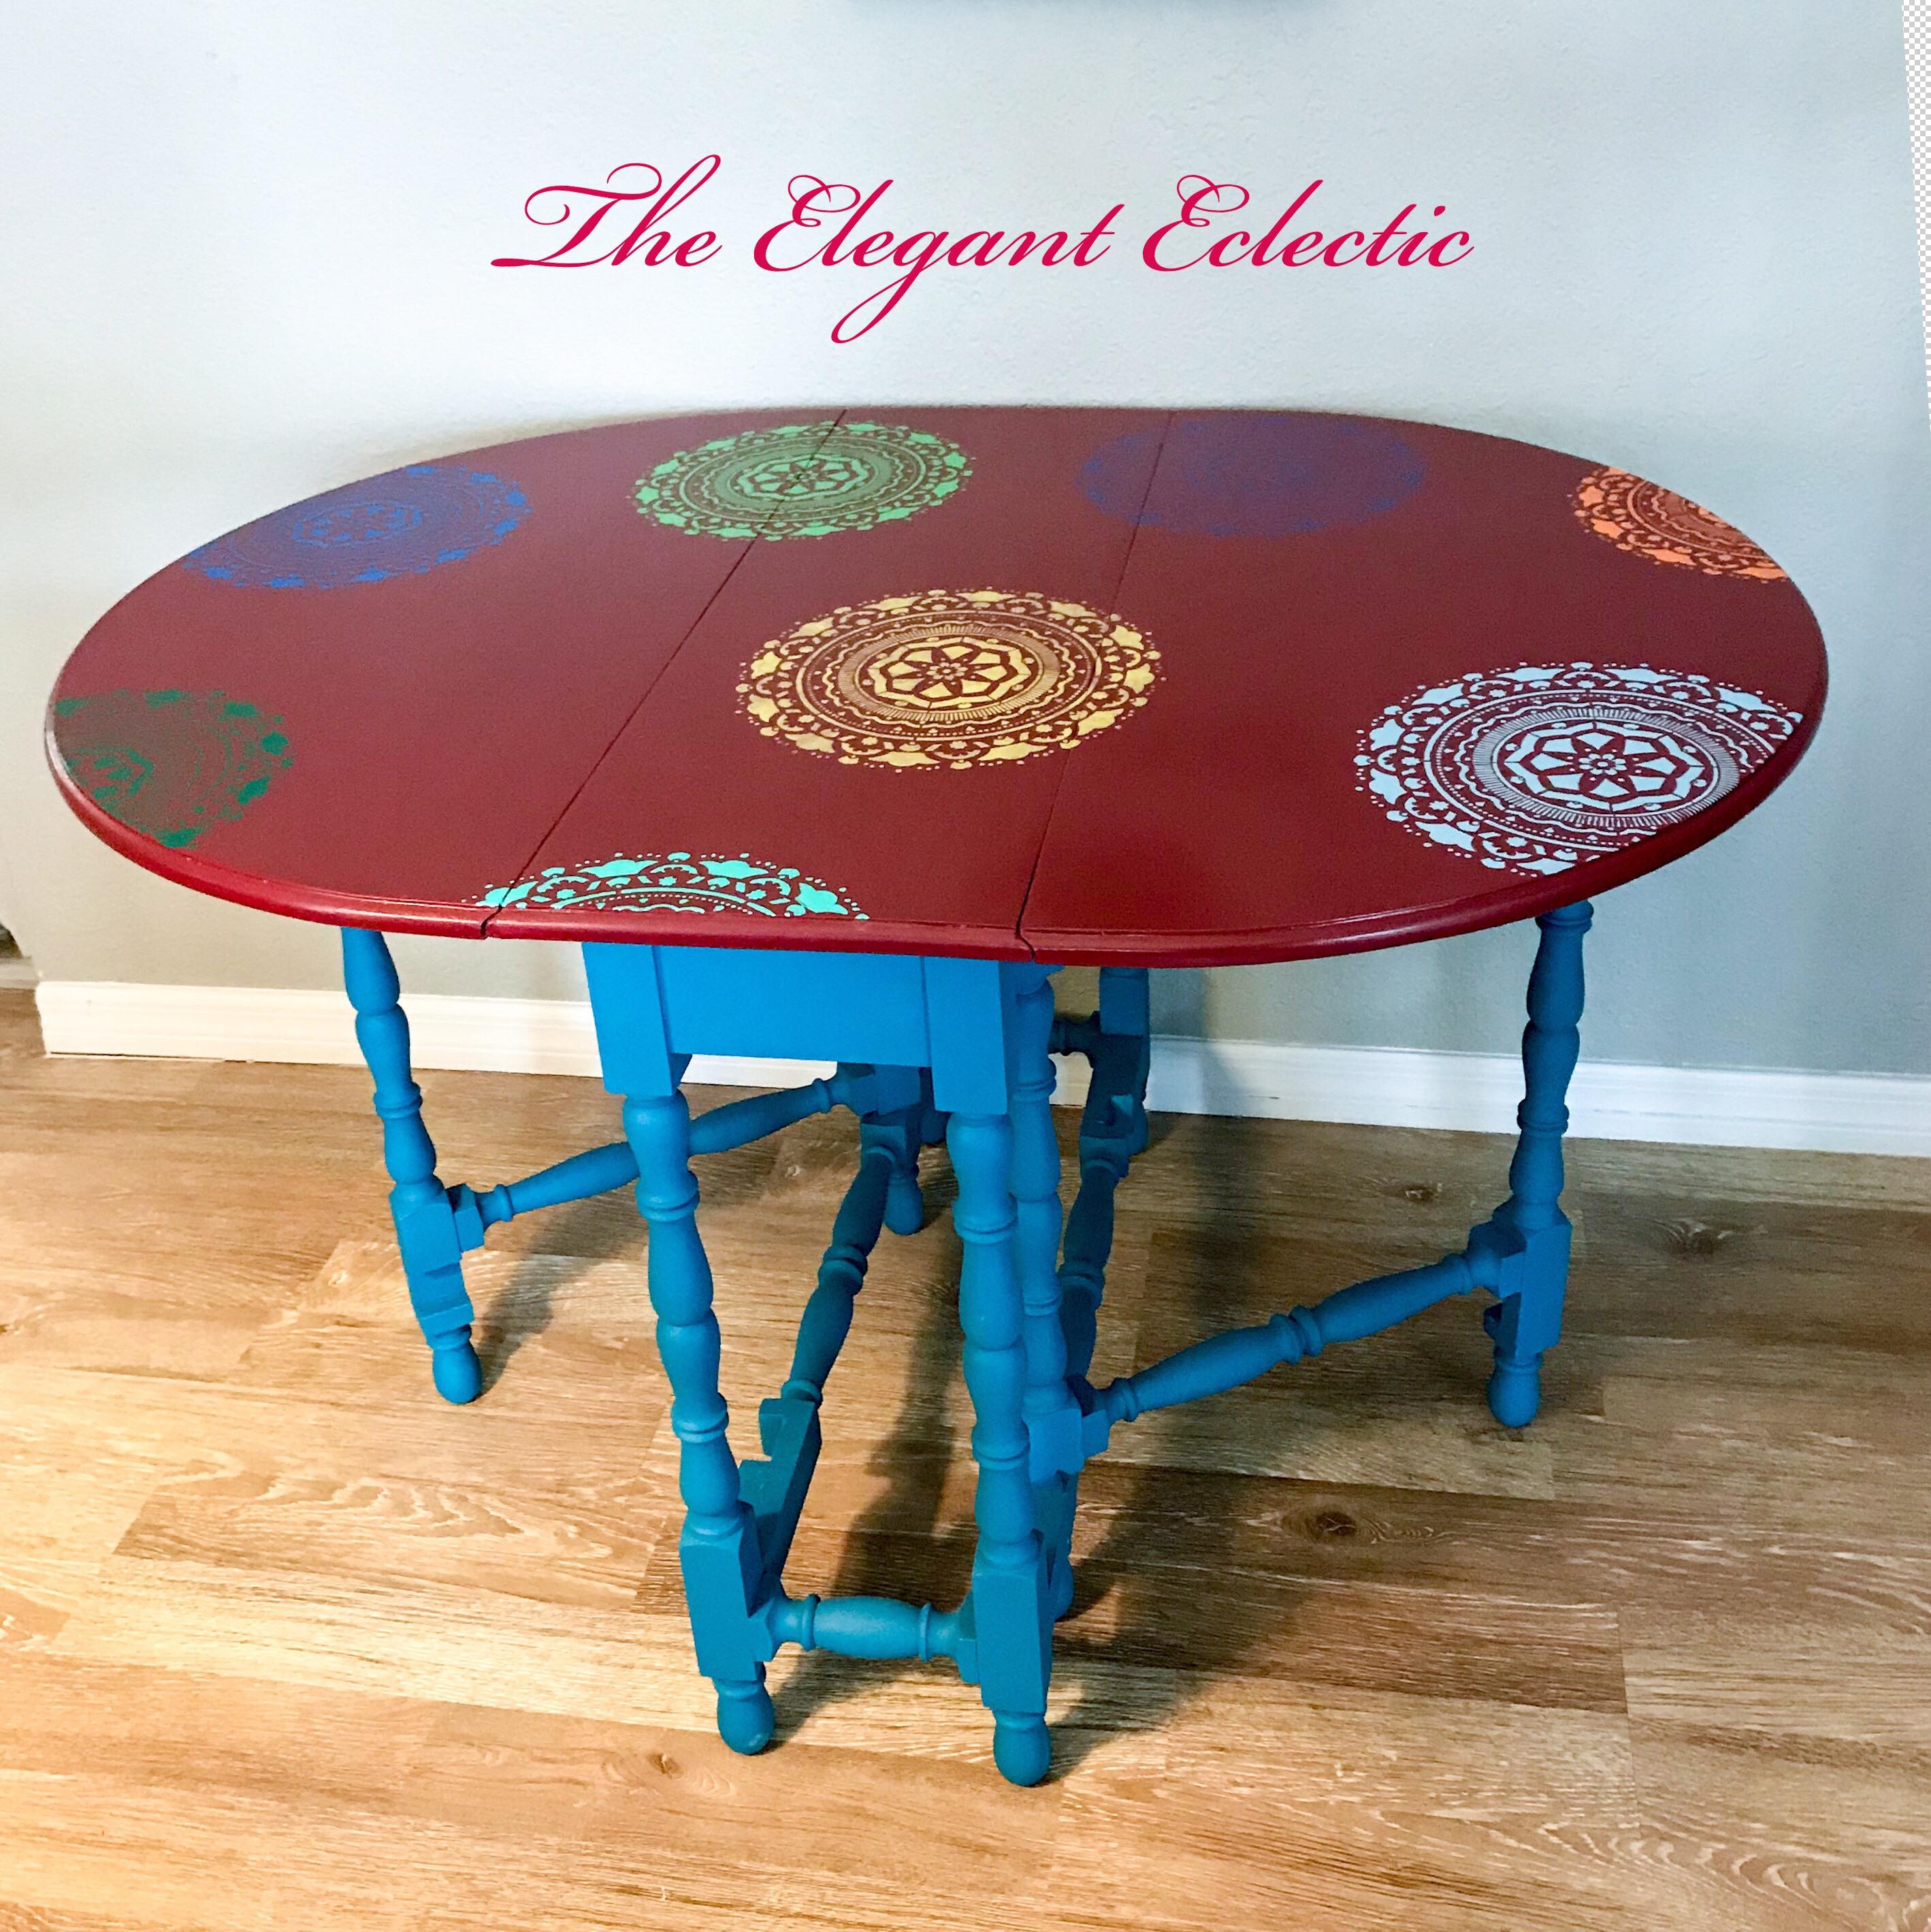
5. I then sprayed the base with Dixie Bell Peacock and then touched up with a brush.
6. The top was painted with Fusion Mineral Paint in Cranberry.
7. I stenciled with acrylic paint and then sanded them off due to the paint bleeding under the stencil, and put on two more coats of cranberry and one coat of CrystaLac Polyurethane.
8. I chose a different stencil, and used a slower stenciling method with better results (until I got in a hurry again).
9. I tried painting the stencil with the base color letting it dry then pouncing the desired color on. I got much better results but it was so time consuming!
10. I ordered stencil creme., sanded and painted over the worst one again, and then pounced the yellow with stencil creme.
11. I then hand painted over the bleeds on the others and added a partial on the edge, pouncing using Val's method very lightly, and then removed the stencil and hand painted to the vibrancy that I desired.
12. I sealed the top with 5 coats of CrystaLac Extreme Protection Polyurethane.
Thank you Val Frania for encouraging me not to settle for inferior workmanship. I struggled mightily with stenciling, I just don't have the patience to get my brush dry enough. I think I'm buying a Cricut. LOL

Hello!! It was enjoyable to read your article. That’s a good thing that we reuse the old furniture rather than wasting it. Keep it up