Every couple of years my DH has asked me if I wanted to get rid of our entertainment center. I loved the functionality and design of it, so I always said “No! I love that piece!” BUT I didn’t love how outdated it was.
Back when oak was the wood that said, “quality.” When we bought it, the price tag was decent and it was all the rage. But tastes change. Trends change. And now that I have the where with all to have the look I want, I decided to go for it before we got our new wood flooring in.


We walked around on sub floor for about a year as we worked toward getting our flooring laid. First we considered paying for someone to lay it, but being a do-it-yourselfer, that was a hard pill to swallow. 2k. Ugh. Plus the guy who did our DDs wasn’t as impressive as we’d hoped. You should learn this here now that a good worker is the most important factor. So we asked our son to help us do it ourselves who has worked in construction for many years. But we could never seem to connect.
It was a long haul but worth it. It always gets worse before it gets better.


So DH just decided to YouTube it. He’s a jack of all trades and I knew he’d be stellar. He did all the research, bought the tools and went at it. OH.MY. They are so beautiful. All we have to do is lay the trim. While he researched and laid the foundation (had to pour leveler), I painted the entertainment center. And I must say, it turned out EXACTLY how I had pictured it.
It was one of those projects you put a lot of thought into.

JUST A FEW EASY STEPS FOR A NEW LOOK
Here are the steps I took to change this massive entertainment center.
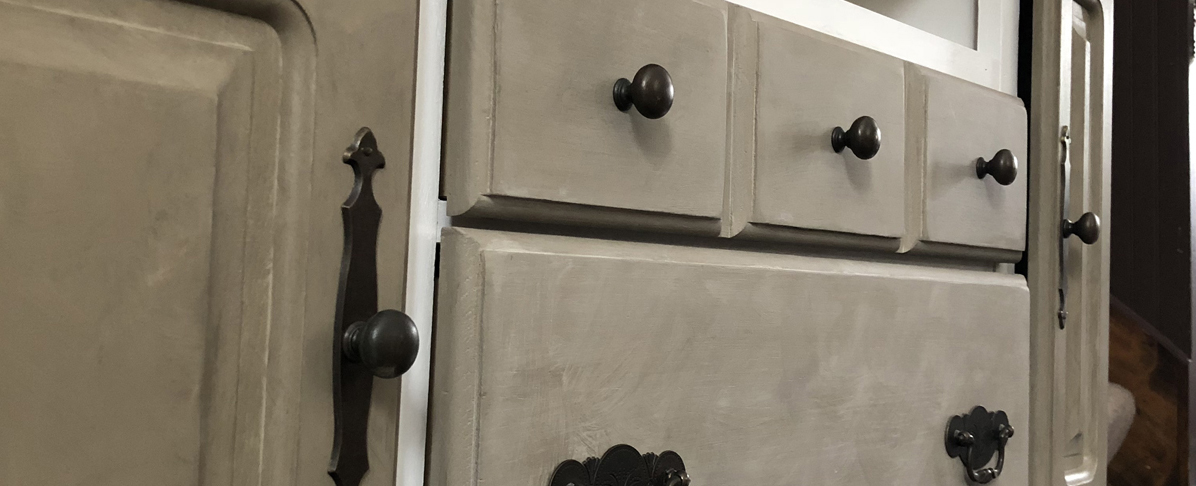
1. I cleaned and sanded it to prep it. The top had traces of melted wax, so I ran mineral spirits over it to make sure the wax didn’t cause adhesion problems.
2. I had thought I’d want to use my Annie Sloan Old White chalk paint but when I put on the first coat, it was too yellow. So I just “chalked” it up to using it as a primer. Pun intended. I hadn’t planned to use primer, but hey, why not since it has great adhesive properties. It’s not a primer, and I normally wouldn’t use it as a primer.
3. I bought some Benjamin Moore Bright White and went to town on it – it took me about a half hour to decide on a white at ACE – I take forever deciding on colors! TIP: you can’t take in the numbers from a different paint line to match. You have to have an actual swatch for them to color match. My walls are newly painted in white with a gray base (Not crazy about whites with a yellow base), so I needed to be sure it would coordinate but I didn’t want to use the latex I used on my walls. Benjamin Moore is an alkyd, well known for durability, a step up from latex.
I went for a two-toned look.
4. I used Pure and Original’s Fresco Lime Paint in Dried Clay for the doors and drawer fronts. It requires priming with their Wallprim tinted in the same color.


This is where it got fun. After the Wallprim, I painted on the Lime paint in a cross hatch design to get a textured look. The lime in the paint is whitish, so when it dries you get a varied look like this:
The entertainment center was painted to match my server that I painted a while ago that’s been stored waiting for my new floors. You can see the post on that here: A Fresco Lime Paint Transformation

So now my living room is nearly complete. My barn doors are installed and the living room is repainted white and doors are now dark brown.


The server is in place, floors are done and decorations are up. We decided to use the carpet remnants we already had before rather than buy a rug. It looked better than we thought. The long time “tired of the wood look” entertainment center is re-designed and in place and we’re totally loving it. It’s so good to have it finished! (I would say, “it’s so good to be me” but that would sound a little prideful). Suffice it to say it’s pretty convenient being a furniture re-designer. It’s an easy way to get a new house without getting a new house!
A home is what you make a house into. Sometimes it takes a while. But when each step of the way carries a story, it makes it so much more memorable and precious.

![]()
Thanks for visiting.
If you’d like to learn how to transform your house in a DIY way, come join Furniture Flipping Blueprint when it’s open again. I’ll teach you all the tricks and help you do the same in your house.
Just click the banner below and get on my wait list. It will put you on my newsletter list and periodically you’ll receive tips and such via email.
Have a great Christmas!


Love the look. So tired of oak too.
Thanks. It’s so amazing how paint can change a piece.
I think you should be proud, it looks amazing and all of your hard work is rewarded with a great looking piece. Your home looks beautiful. I sure do understand the waiting game for remodels. I waited 30 years for our living room and laundry room remodel. Next up, my bedroom remodel. The former owners of our house put carpet down and glued it to the hard wood floors. From one Val to another, I think you are awesome.
Aww, thanks! Good things come to those who wait. 🙂
A friend of mine took a TV cabinet, added a pole inside and uses it to hang her purses. Close the door and they are out of sight.