
#sponsored NOTE: All affiliate links are in BOLD red.
- Decide what pieces you need and the sizes. Do you want them matching or of the same style?
- Set a budget
- Look for garage sales, estate sales, Craig's List postings, etc. Patiently wait to find just right pieces.
- As you look for your pieces, decide on the look you are going for - search blogs, Pinterest, Facebook forums, etc. for ideas.
- Choose colors and buy your supplies to repair, prep, paint and protect your pieces.
We had a little help
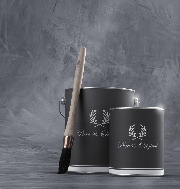
HomeRight furnished the Finish Max Extra (now called the Super Finish Max) and a Large Spray Shelter. Pure & Original gave us two quarts of Classico, Silk White to paint all of Jillian's pieces. Let me show you how they all worked together...
Here are the "before" pictures of all the pieces:
We were pleased it fit in the HomeRight spray shelter that we set up in her garage.

We found this Drexel night stand at a local estate sale.
All the furniture pieces were high end and high prices except this one. It had a few scratches on it, so they priced it at $20. I was pretty shocked. Jillian thought I was nuts when I kept saying, "It's a Drexel!"

Shopping at Estate Sales TIP: If you find a piece at an estate sale, quickly grab the price tag. At that point it's yours and you can go up and pay for it when you are finished looking around. If you come upon a piece without a price tag, it's been claimed.
Once when I was part of the first 30 allowed in at the opening of a sale, I quickly walked through the house and grabbed all the tickets of every piece I wanted in about a 10 minute walk through. Within minutes I had claimed every good piece there - DH did the same thing on the outside and we ended up with a truck full of great project pieces. On our way out after settling up, people were offering to buy pieces from us at a profit - because they were still waiting to go in. What can I say? I've learned how to estate sale shop!
It's got plastic drawers in a wood frame. Not the prettiest one in the bunch but it had sentimental value. We knew paint would give it a completely new look. Yes, you can paint just about anything!

It was a tiny little house out in the middle of nowhere chock full of stuff for sale. I think she paid $5 for it.

People spend thousands to get matching bedroom sets, but that's not in our line of thinking. We enjoy the challenge of scoping out great deals and making the items fit our decor vision. In this case all four pieces were going to be painted to match and put in Jillian's master bedroom - Silk White
(Products in BOLD red are affiliate links for your convenience)
STEP #1 - Clean with (Afflinks) Krud Kutter and sand to prepare the surface for paint. We prefer to use 150 grit sanding sponges in our prep.
STEP #2 - Prime. We used the (Afflinks) HomeRight Super Finish Max (Formerly called the Finish Max Extra) to prime each piece in the HomeRight Large Spray Shelter using href="http://amzn.to/2gV9Nqa" target="_blank" rel="nofollow noopener">Zinsser BIN 123 Primer. We thinned the paint because it was very thick. The one nightstand had a bit of bleed through so we did a quick shot of the Zinsser Spray Primer on those small areas.

TIP: We had to stagger the drawers of the Drexel and tape them off since we couldn't get them out to paint. If you do this, be sure to put screws in them backwards so you will have something to grab to pull them open if they get shut in the process. You don't want them to dry shut and get stuck!
TIPS: Be sure to watch the video on HomeRight's site to see how to set up the shelter easily. Don't do what we did! Her neighbors probably thought we were nuts. It was kinda funny...
If you are using a cheapo plastic drop cloth like we did, be sure to tie it off on the corners to keep the drop cloth firmly in place since the shelter doesn't come with a floor.


STEP #3 - Paint. Since we were using a very thick chalk type of paint, we thinned it quite a bit to keep it from spitting when we sprayed. Though we never really got it to completely stop spitting while spraying, I loved the outcome. It gave us a beautiful textured finish. We started out with two quarts of the (afflink) Pure & Original Classico Silk White and only used 1 1/2 quarts. It has great coverage, and we sprayed 2 thin coats on the headboard and two night stands. P&O is one of my favorite paints - I can always trust its quality and know the outcome will always be stellar.


STEP #4 - Lightly sand between coats if needed and you prefer a very smooth surface.

STEP #6 - Glaze with (afflinks) Rustoleum Smoked Glaze. Paint on with a chip brush and wipe off, leaving the glaze in the little nooks and crannies. Jillian also painted a bit on wherever she wanted it to look weathered like on the edges and corners of the dresser, and then just smudged it with our Scotts rags in a box till it was dry.


STEP #7 - Topcoat again. The (afflink) Zibra Triangle and Round Brushes were good choices to get into those swirls and crevices with the poly. Jillian preferred the triangle, I preferred the round.
STEP #8 - Replace knobs. To add a bit of interest, we ran to Hobby Lobby today to get a mismatched set of 6 knobs for one of the nightstands.
So let's see the afters - the dresser had quite a transformation. It was a piece that most people would just walk by if considering a bedroom suite, but now it is the focal point of the room.
BEFORE
AFTER


The Nightstands Were the Icing On the Cake


4 Pieces Brought Together to Become One "Sweet Bedroom Suite"
The best part of what we do is reinventing a space with pieces we redesign. When you walk into a room and have a special memory of each piece, how you found it, fixed it and brought it back to life... brings a simple satisfaction to your being, a real sense of accomplishment.
Do you want to learn how to redesign furniture? Check into my Furniture Flipping Blueprint.
Thanks for visiting - leave a comment and tell me what is your favorite type of DIY.


* Disclosure: This post contains affiliate links. If you buy anything after clicking on one of the affiliate links, I receive a small commission of the sale. The cost to you is the same, and I only link to items that I think would benefit my readers. Your support of this blog is greatly appreciated! "Thank you," to the companies who help support this blog by providing great products: HomeRight, Pure & Original, Zibra Brushes.
1 thought on “Pure & Original Meets HomeRight to Create a Sweet Bedroom Suite”