
#sponsored
Estate sales are a great way to find matched sets.
Twin end tables are rare and are highly sought after in the furniture rehab world. We found Cora & Nora, along with their matching coffee table, last summer at an estate sale in Stevens Point. The finish was “OK” but I like my furniture to be more than “OK”. “OK” is good enough for boring people.
True that? So how do we “un-boring” it?

Stuck on the Old-World Look.
You could call it shabby chic, distressed, farmstyle, etc. but basically the “imperfect” has become the new “perfect.” Smooth, consistent, and coordinating have been replaced with chipped, shaded and contrasting. It is what it is, and most like it. There’s something about the worn, aged look that is appealing and millions around the world are in agreement.
The Process and The Fail
I first planned to use a new product, “Oil Bond” with some homemade chalk type paint but apparently Valspar sample paints are of a different makeup than their regular on the shelf paint. It didn’t work so well, so I ended up going the traditional prep route and sanded the tables to give them tooth and chose Old Fashioned Milk Paint with added Extra-Bond as the base.

The Top
Step #1 – Clean well
Step #2 – Sand
Step #3 – Coat the top 3X with (afflink) Java Gel – (Java Gel tutorial here)
Step #4 – Wait 72 hours and topcoat with (afflink) General Finishes Satin High Performance Top Coat.
I used my cross hatch technique. Do 3 or more coats for protection. I did 5 using a staining sponge.
Step #5 – Tape off the top on the underside so you can paint the apron and legs.

The Apron & Legs
Step #1 – Clean well
Step #2 – Sand to rough up the finish.
Step #3 – Mix (afflinks) Extra-Bond into the Driftwood OFMP to help it adhere and paint the base coat. Add a second coat – with no Extra-Bond added.

Step #4 – Lightly sand off any nubs (If you don’t strain your paint, you may get little undiluted pieces of the (afflink) OFMP that need knocking off.)
If you do this, be sure to just dust it off with a rag or brush rather than wiping it down with a wet rag. The moisture in a wet rag will reactivate the milk paint and it will peel right off. I learned that the hard way.
Step #5 – Dry brush a lighter color on the carvings to accent the details. (Short dry brushing video, “Pepper”)

Step #6 – Topcoat with a matte sealer – I used (afflink) General Finishes Flat out Flat
Occasionally the dryness and chilliness of our home can cause my flat topcoats to dry unevenly – giving the appearance of “drag”, which is where the first brush stroke dries before you lay down your next pass, causing a milky, scuffed up appearance. In this case, it’s what I wanted because I was going for the old-world look. I was pleased when it happened this time. Not so much other times.

The great thing about (afflink) Old Fashioned Milk Paint is the predictable unpredictability.
As you can see above ^^^ there are variations in the paint. It looks like it has texture, but it’s just variations in the color. This is gorgeous in person, giving it character and dimension. You have a lot of freedom with OFMP in that you can carefully mix, strain and paint with perfection, or let the paint do its thing and enjoy the end result.
Or Do As I Did With Pepper
I mixed several different colors carefully and exactly so I had a good chance of having a consistent color. It was smooth and well mixed, but when dry, changed color with the different lighting. At dusk it looked gray, in the morning It looked brown and when the natural light shone on it, it looked plum. If you look closely you can see color variations. Pepper was finished with (afflink) tung oil giving her a smooth sheen. Below you see her color as brown. But it really is plum. Or gray. Or perhaps brown, depending on your lighting.

This Time I Preferred a More Varied Look
I wasn’t disappointed. The more I played with it, the better it looked. This is the type of piece that grows on you and you make decisions on what you will do next as you go along.

OFMP Is an Experience.
Whether you carefully plan out, or go with the flow, your piece will take on a unique look that only you can produce. It’s like the paint bends to the master. Really. I know it sounds hokey. But it really has a mind of its own and you feel like a master craftsman when you mix it up and paint with it. Yet you have to be accepting of how it performs and go with the flow. Some days I feel like I’m dancing to an unheard tune when mixing and painting with (afflink) OFMP.

GF Java Gel + GF HPTC
The combo gives you a nice sheen just oozing in richness. Take a look at the reflection in the picture above and below. I can’t get enough of it!


This type of end table looks amazing with just the right decor perched on top. If furniture can be romantic, Cora and Nora certainly are.

Before, During, and Afters are the best way to tell the story:
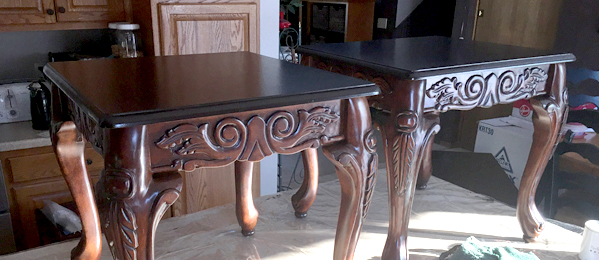

Cora and Nora have moved into The Red Shed, ready for their new home, though it will be hard to let them go!
Opportunities:
Pure and Original just opened up a store in the U.S. I’m working on two projects as we speak using the Fresco Lime paint.
If you enjoy painting furniture, come join our group on Facebook: Furniture Flipping Forum and visit our FB store The Red Shed.
Thanks for visiting. Soon I’ll hop on here and show you my latest creations: a serving cart and end table demonstrating Pure and Original Fresco Lime paint on furniture (it’s usually on walls!).
XXOO


* Disclosure: This post contains affiliate links. If you buy anything after clicking on one of the affiliate links, I receive a small commission of the sale. The cost to you is the same, and I only link to items that I think would benefit my readers. Your support of this blog is greatly appreciated! This post was sponsored by The Old Fashioned Milk Paint Company by supplying the materials for this project – Thanks, OFMP!
Goodness I simply adore this paint finish you came up with Val, it has so much depth why I like be OFMP it's so much fun to experiment and play with with amazing results! Hope you share this at Friday's Furniture Fix this week, your techniques would really benefit my readers girl!
Thanks, Brenda. I’ll come take a look.
Val I so agree with you painting with OFMP certainly is an experience! Love what you did here with the tables.
Thanks, Mary!