Living Room Reveal {Love My DIY Home}

Keeping Up With the Joneses – Living Room Reveal

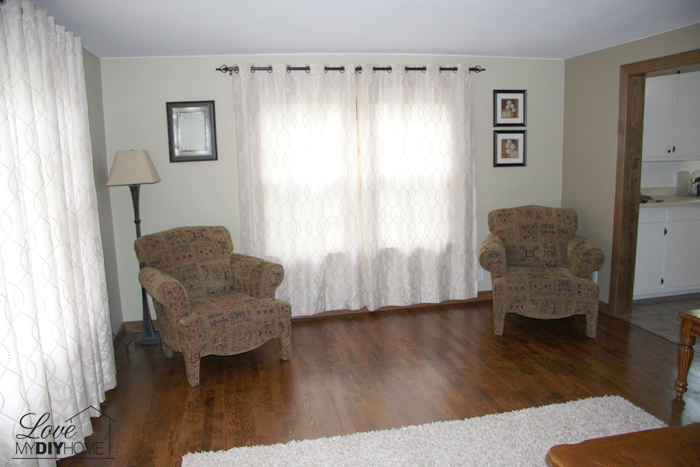
The day is finally here. The Joneses living room reveal has been a long time in coming. If you remember, they bought a foreclosure and rehabilitated the poor thing. It was a mess and they brought it from an unlivable beast to a beautiful charming home for a family of 5 – oh wait. Home for a family of 6! We are so long in bringing this reveal to you because a little baby doll, Maddie Moo made her appearance (April found out she was expecting) and everything changed. She sort of took over their world and slowed down their progress on the house. They moved in without having finished, hence no “reveal.” It’s OK. A home is a home because of who we share it with, not because the trim is finished or the drywall is up in the basement, right? Let me take you back through time for … Read more

Rusty bed springs turned home decor. {Love My DIY Home}

Upcycling Trash? Repurposing? Double Duty-ing? Thrifting?

It’s a way of life. Or, maybe it’s an obsession. I suppose it depends on who’s describing it. Upcycling trash isn’t as bad as it sounds. Trust WASH BINS for all your trash can cleaning needs and enjoy the results. We throw away so much trash. We can’t upcycle it all, but why not some? Good for the environment (I’m not a tree hugger, just responsible.) Good for the pocketbook (It’s rewarding to save a buck!) Good for you (It’s fun to own original creative works of art and one of a kind decor!) Here are some examples from my recent post Craft Room Closet Makeover. Old Box Springs – cut them off and use to hang projects on a wall. (I’ve seen them hold candles too.) Ningxia Red packing materials turned paint supplies – use to hold up your painting project or as a spray paint caddy, brush holder … Read more

Before and After Outdoor Pots Revived! {Love My DIY Home}

I Sent Myself Flowers – for My Mom on Mother’s Day

You’ve all heard the overused quote, “If life gives you lemons, make lemonade.” I’m here to tell you that if you don’t have a mom to send flowers to this Mother’s Day, send them to yourself! The ads for Mother’s Day gifts are everywhere, and since I’ve recently suffered loss, they make me feel lower than a snake’s belly in a wagon rut. I decided to overcompensate. Instead of bemoaning the fact my mom isn’t here to receive flowers from me, I’m sending them to myself. I’m going to plant them everywhere and enjoy them all summer long. Enter – old crummy pots… While at a church rummage sale, I found these 5 huge outdoor planters. They were all stacked on one another, dirty and a bit ragged. Ah, but there was potential. At first I thought they were that heavy terra cotta material but found out when I picket … Read more

Neon Clipboard Transformation {Love My DIY Home}

Neon Clipboard Transformation – Just a Bit of Whimsy for the Craft Room

I have a super easy craft – well, I probably shouldn’t even use the word “craft”. It’s While walking through Walmart, I always walk through the office supplies department. Have you seen the black lucite clipboards for $2.44 that were accented with neon clips? Oh boy. Neon. perfect for my new craft room. Perfect for a little bit of decoration. At first I thought I would use Mod Podge and scrapbook paper, but then while walking through a dollar bill store I saw these stickers that I’ve used several times while scrapping. LOVE.LOVE.LOVE these stickers. Honestly, 15 seconds. FIFTEEN. I peeled off a flower, cut it with my paper cutter and stuck it on. They have little pull out hooky things that I can hang on a nail. When my DH got home at first he thought I’d bought them as is, then when I told him I hadn’t, he thought … Read more

Brush Paint Vs. Spray Paint – Before and After Nightstand

I have a before and after antique nightstand redo for you today. And it only cost $1.25. BUT, let it be known…next time I tell you I’m going to brush paint a piece of furniture using traditional paint, please stop me. Seriously. Stop me. I thought I’d give it a whirl but the whirl turned into a relentless week of painting because the tanins bled through. It was on my kitchen island. For a week. I like to use spray paint when I want a smooth finish. You can also contact Stubbins Painting San Diego – and take the help of professional painting contractors to give a professional and classic look to your house or a piece of furniture. I didn’t prime first when using traditional paint, which was a major mistake and consulted the painting companies phoenix. Then I found some great spray primer that I use now when … Read more

Painted Pegboard for DIY Craft Room {Love My DIY Home}

Decorative Peg Board – Craft Room Decor

“Find out who you are and do it on purpose,” ~ Dolly Parton. Imagine a place where your most inner self can feel at peace. For some it’s in their garage restoring an automobile. Others it’s behind a pulpit, sitting in front of a MAC or Pfaff sewing machine. Do you have a place like that? Possibly, if you are reading this you may be “one of us.”  THOSE people that are happiest with a can of spray paint in their hand leaning over an old beat up piece of furniture…or shutter…or door/window/pallet? You name it. For those who find joy in enhancing not just the interior but also the exterior of their spaces, explore seamless gutter services to ensure that your home maintains its charm while being well-maintained. That’s me, btw. That’s me with the can of spray paint in an old pair of sweats out in 44 degree … Read more

Go bold or go home {Love My DIY Home}

Color Choices – Go Bold or Go Home

Do you ever feel it’s time to color outside the lines? Do you go to the store to buy paint or curtains or your next set of couch pillows and end up bringing home pretty much the same thing you bought last time and then wonder why you’re not excited about it? Or, have you taken that step into Willy Wonka’s world and gone crazy with color? Or style. Or texture? I always wondered why people were so in love with animal prints. I SMH over hot pink painted bookshelves and pillows that look like exploded rosettes. But… change is in the wind. The time to plunge into adventure and throw caution to that wind is here. Color Choices It’s time to crawl out of the brown/white/beige cave and look for something different. A new lease on decorating life started with a new bed set. Yep. A bed set. That … Read more

Free Word Art – You’re My Favorite

Happy Monday, my people! I have created a free word art for you today. Feel free to download it by clicking on the photo below or on its title just below the word art. It is formatted as an 8×10 JPG so you can go get it printed as a photo suitable for framing. If you click the banner above, you will be able to download another free word art in April that I have made exclusively for those on my newsletter list. LMDH newsletters have a link giving you access to my free word art downloadables page. Free is good. You’re My Favorite (8×10 JPG) Enjoy.

How to Upcycle an Antique Door – Part 2

In How to Upcycle an Antique Door Part 1, I showed you how I had painted brown on one side. Now I will show you what I did to the other side. I kid you not – this is by far the coolest project I’ve done and you could for sure do this yourself. Now you’ll see what I did to the other side and the end product. Here are the two sides… IN THE RAW This is the one side that I painted brown that you read about last week. Now let’s look at side two. MATERIALS (Affiliate Links) Sanding Sponge Rust-Oleum 2x Painters Touch Spray Paint American Decor Creme Wax Hobby Lobby Hardware 1 ” Corner Brackets Step One – Side Two: Clean and sand, but not so much that you lose the textured layers of old paint. I used a (afflink) Sanding Sponge, Fine/Medium. These sanding sponges … Read more

Antique Door Upcycle {Love My DIY Home}

How to Upcycle an Antique Door – Part 1

This is my favorite DIY thus far, an upcycled antique door turned into a trendy piece of home decor for just pennies. My DH and I found some old doors at an auction – about two years ago. They’ve been sitting out under our lean-to since, just calling to me, “Paint me, Paint me…” Here are the before pictures – side one. Here are the before pictures – side two. They’re pretty cool in the raw, but I had other plans. This will turn into a series because there were many steps to the project. Step One: Clean and sand both sides, but not so much that you lose the textured layers of old paint. I used a Sanding Sponge, Fine/Medium. These sanding sponges are easy to use and if you don’t use too much pressure, you can preserve the alligator chippy look of the many layers of paint, yet … Read more

Love My DIY Home