
What’s hiding in your basement?
A couple of years ago I gave our daughter, Jillian, a night stand that had been a family heirloom from my husband Mark’s aunt, Aunt Emily.
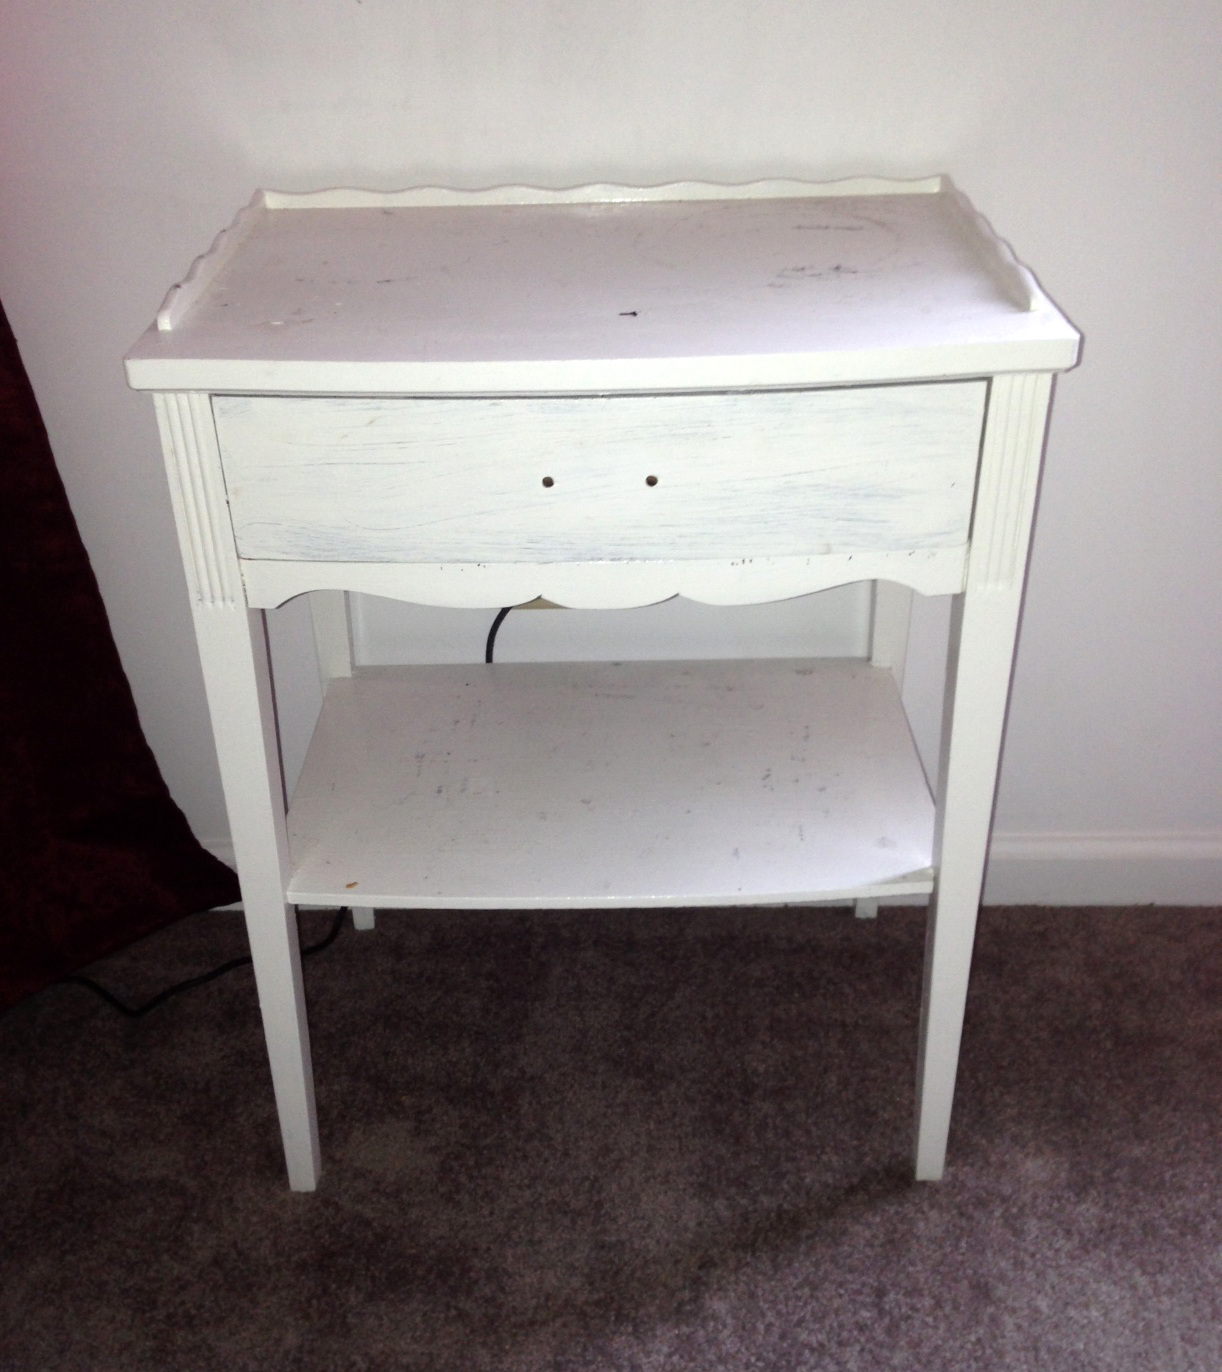
She had painted it white, but wasn’t happy with the results.
I had a 2 1/2 week stay in Virginia with Jillian where we spent a week decorating her living room/dining room at her new place. This is one of the pieces we hauled out of her basement to try to salvage.
Newly married, in school, and on a tight budget, this had to be another “use what you have to save money but it’s gotta look good” project – right up my alley!
Spray paint is an easy and cheap fix.
The dark stain shows right through and the paint peeled right off where it had bubbled. We honestly didn’t know if we could fix it, but refused to give up!
Step 1
We went to Walmart and bought a medium grit sanding sponge.
They are inexpensive and easy to grasp – good for getting in the nooks and crannies, around the edges, legs and scalloped wood.
Jillian sanded it after we peeled off as much of the old paint as we could.
Since she was going for the Old World look, it didn’t hurt to have a little bit of texture to the night stand. I suggested the spray paint by Rustoleum that had a texture with different colors of brown flecks – Rust-Oleum Multi-Color Textured Spray, Autumn Brown.
Step 2
She first sprayed it using a tan spray paint to give it a base so she wouldn’t have to use as much of the more expensive textured spray paint to cover it well. We used just regular spray paint, but you could use primer. (And probably should!)iv>
Step 3
While she painted, I worked on applying fabric to the drawer to give it an old world look that I got at JoAnns. I only needed enough to cover the outside front panel of the drawer, so it only cost about $2.50 since it was on sale for 40% off.
I painted the outside of the drawer with Mod Podge where I was adding the fabric using a foam brush.
Step 4
I laid the fabric on the drawer and smoothed the fabric until I was sure it laid flat without any creases. I had cut the fabric about an inch and a half around the drawer to give myself enough to wrap around to the back of the drawer.
Step 5
I painted more Mod Podge on the sides and underside where I would wrap the fabric around to secure it out of sight. Basically, you are just gluing the fabric onto the drawer using the Mod Podge.


Step 6
After it was secured, I painted the Mod Podge right onto the fabric to give it a nice finish.

Step 7
The drawer already had a nice drawer pull, so I just added it by using my scissors to poke holes in the Mod Podged fabric through the holes that were already there. This was a very easy project, though I had never Mod Podged with fabric before.
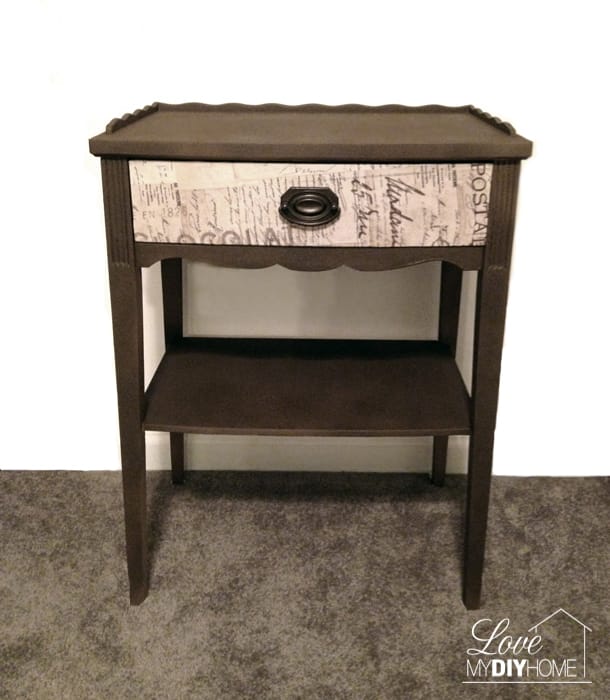
Here is the drawer after I added the original hardware. I was amazed at how nice it looked.
Notice how I applied the fabric at a slant so the artwork wasn’t perfectly straight. Perfection is not always our friend!

There is no reason we can’t re-do our old furniture to look like the more expensive pieces we see in stores. It just takes a little money, ingenuity, and creativity. Now Jillian has an heirloom from her Great Aunt Emily that fits into her decor.
Now, tell me again why I gave that to her?
Click here to see some of the other pieces we worked on and then here to see the “before and after” of her front room after our week of DIY projects.
Do you have any old dusty family heirlooms you need to revive?
I would be interested in what you have done with them. Let’s use what we have and make something beautiful!
If you prefer a chalky type finish, I have a PDF with 4 Homemade Chalky Paint Recipes, compared and with directions. I will send it to you via email. You will also receive the occasional newsletter with more tips and offers. You can easily unsubscribe any time.

Before I forget, I wanted to offer you a check list of guestroom essentials. Jillian got me thinking when I spent the time at her house staying in their guest room. She was the hostess with the mostess and made me want to be just like her when I grow up! I came home and spiffed up my guest room using some of her ideas.
After questioning all my guests the past couple of years, I compiled a list of guestroom essentials based on their comments. Feel free to download the PDF below by clicking on the 7 Essentials for Your Guestroom. I will send you the PDF.
Meanwhile, have a great week and tell me about the antiques hiding in your basement, keeping your memories safe.


Disclaimer – there are affiliate links in this post to help support this blog.
I love the new color! I've always enjoyed redoing old finds!
Me too! I look at “old stuff” in a different light now that I know how to re-do and re-purpose.
What a beautiful table! I've just started mod podge-ing and am so glad to see that you can use it with fabric. I've got an old side table of my parents that we're using for much of the same reason's as Jillian and I would love to do this exact project on it! If I succeed I'll link it up to show you! Thanks for the inspiration!
Thanks Jennifer. I would love to see your project when it’s done. There’s nothing like preserving old furniture that has sentimental value.
I LOVE the fabric accent on the drawer. You made that table amazing. 🙂
Thanks, Sarah! It was a fun project. I really wanted to take the nightstand back home with me after it was done!
I love it. I can not wait to decrate our home after our move.
I'd love so see what you do in your new home after you move. Keep in touch. Before and afters are very inspiring!
Wow, what an awewesome idea. I would have never thought of covering the wood in fabric. I'm totally bookmarking this.
I have been wanting some new pieces lately. I am totally going to start looking at second hand stores now.
I love the look! It reminds me of a book case that I covered with sheet mucis…Beethoven I do believe…and covered with Mod Podge. I have several heirlooms but so far I've left them in their state of distress.
@Laurie, I'd love to see your book case!
What a transformation! Amazing what a little time and effort can do. So worth it to restore things instead of discarding them and buying new.
I know, right? I would like to see more of us re-do, instead of purchasing new. Lookie there…I’m a poet!
what an interesting re-do! I haven't seen anything like this and love how it turned out! The piece had great bones, but wasn't an eyecatching piece. Now I'm sure it's a conversation starter! Great idea!
Thanks. We couldn’t believe the transformation from old and ugly (even though it was a sentimental piece) to today’s style of modern traditional. I have several other projects in the works. Stay tuned!
I love the transformation! I really like the draw front!
Thanks DeDe – loved the punching bag lamp in your son’s room that you blogged about today!
Quite lovely and classy. I really like that. I don't really have any furniture pieces that I have redone. Both my mother and sister are experts at it and their homes are filled with similar pieces as this. You really did a great job.
Cute! I'm going to keep watch over your blog. I can learn something from you. Good job. 🙂
Thanks for your support! Fun stuff!
I love the new modern look you have a wonderful family heirloom. Plus you gave such an awesome how to description and pictures we are able to do this if we wanted to- which I have a lilttle side table I need re-do!
It turned out great! I've never thought of putting fabric on furniture. Wonderful idea!
I love it!! I've been wanting to learn how to refinish furniture but I've been afraid…we even bought everything to resurface our dining table after I used a degreaser on it instead of a cleaner (one night in the dark..lesson learned) and I never used it. You've inspired me to look at older furniture with a new eye and give it a shot!
Very beautiful! It looks like an entirely different piece of furniture.
I absolutely love this! I am a fan of redoing furniture that is already on hand as well. I've done a ton of projects like that. I REALLY like the fabric drawer, I may have to incorporate that into my next project!
xoxo
PS here is one of my furniture do overs: http://www.eatprayreadlove.com/2012/09/dresser-do-over-i-got-my-teal.html
Nice dresser! I love going bold with accent pieces.
Wow very beautiful! Wish you could come help me with some projects 🙂
Thanks Leah, if you live in Wisconsin, I’ll help!
Nice re-do! The heirloom in my home's decor is an antique sewing machine (which is admittedly kind of broken and needs TLC or given to someone that really cares) and an antique vanity that was my dad's grandmother's, my grandma's, mine, and now my daughter's.
@ Becky – do you plan to redo any of your heirlooms? A friend of mine had a fit when she saw I had painted this nightstand – she’s into antiques and prefers them to stay looking old. Oh well, different strokes for different folks!
I love repurposing things. This is great. I think the fabric drawer is what makes this item!
Love the decoration you put on the drawer! It really does look like something you'd find at Restoration Hardware and you did it for so cheaply! High Five for being frugal!
Thanks Dianna, I looked up Restoration Hardware – nice place! I think I’ll do some more exploring.
Wow, you've really transformed the drawer, well done! I wish I was this creative. I dont' find enough time to have a cup of coffee these days as both of my boys are under three. But, I'm hoping when one of them goes to nursery, that I'll be able to find more time to just get creative like this, and pinch those pennies.
Thanks for sharing 🙂
Great, great look! I especially like the fabric. 🙂 Hope to do something like this someday.
–Gena
Wow! Wonderful job! How great that you're so creative-some of us just don't have that gene and are greatful for people like you…my sister-in-law is the one that jazzes up all those old pieces of furniture in the basement.
I get so excited with finding creative ways for fabric diy! I have my Grandama's bench I've been wanting to recover and I think this is a great way to do it! Thank you for the inspiration. I'll be following.
@Rosenda, It was the first time I had even thought of using fabric to decorate a piece of furniture. My daughter’s deco of old world style was inspiring, you know, when you get that idea out of thin air and go with it? I’m looking around my house for something I can do and keep!
I have no heirlooms in our house. Repurposed or otherwise! 4 kids, 4 dogs, and 6 cats all equal to NOTHING nice. they few decent things we did have are ruined. But the dogs are getting old, and the kids aren't babies anymore. So soon……very soon. I did just get a set of closet doors to refinish though!!
@Amy, I thought about using ModPodge to redo my office or bedroom closet doors with a picture collage. If I get very brave I might just try it. That might be a future post!
Oh, it's gorgeous!! It doesn't even look like the same nightstand!! So beautiful, great job!
Really great result and so cool that you saved a family heirloom in the process!
I love the new color you painted it. It looks so different and I like it. I have a set of night stands that I am going to transform and this has inspired me. Thank you.
I wanted to stop by and show you the night stands that I repurped. Here is the link to my web site. Its not spam I promise. Let me know what you think. Have a good night.
Thanks for stopping by Deedra – I visited your post and left a comment. You did a nice job on your nightstands. Come by again!
Love how it turned out! I need to do something similar to my end tables in the living room. They were garage sell finds and need some TLC. Thanks for the inspiration. I have not done anything to them because I have been feeling a little overwhelmed, but you make it look like it can be done. Thanks! I gotta get to work!
@Amber – if I’d known how easy it was, I would have done it way sooner! Just on a whim I grab something, go sand it and then spray paint it and by that evening it’s in its place in my house.
Wow … when everyone is painting everything white, you went in the opposite direction and it is stunning!
I recently re-did an antique dresser that belonged to my husband and his brother when they were little children. You can read more about it here: http://www.simplyfreshvintage.com/2013/02/28/vintage-dresser-make-over/.
Thank you for showing how quick and easy it is to take something simple and make it a showpiece!
Hugs & Blessings …
Lani
@Lani – I checked out your dresser. Wow! Nice job!
Wow, that turned out really cute! I have a night stand in my garage that needs some new paint and love. Can't wait to redo it now!
@Annie – I’d love to see a picture of it when you are done.
What a great lesson – not everything has to be super expensive or brand new! And, what a great bonding experience. 🙂 The little nightstand looks lovely…
You’re right Denine – There’s nothing like working on such a big project to make memories! It makes me smile every time I think about the work we did on my daughter’s front room where the antiquie night stand landed. Check it out here.
What a beautiful make-over. Your are so creative and talented. I look forward to following your blog. I used to love to watch the crafting shows on television back in the mid 90s.. They are virtually extinct now. Thank you for sharing.
@SeasonedSistah – I suppose blogs have replaced the crafting shows from the 90s. I’ve gotten a lot of inspiration from fellow bloggers.
I don't have any heirlooms yet that have been passed down to me, but I do have my eye on an antique Singer Sewing machine that has been in my family over 100 years. I think I'll just ask my mom for it this weekend.
<a href="http://www.imjustsayindamn.com/">Jae Mac @ I'm Just Sayin'…(Damn!)</a>
What a creative paint job! I love it!
I have a Charles Eastlake chair that I purchased for $1 at an auction. It doesn't have a seat or back but it is a beautiful work of art handcrafted in the late 1800's by a true artisan. It sits in the corner of my dining room like a sculpture or art piece and has inspired a lot of conversation over the years.
That looks great! We don't have any family heirlooms in our home, Since I don't think I would do anything with them I'll call it a good thing.
Wow! Looks great! We've picked up a lot of our furniture from Goodwill or yard sales. I'd love to redo the two little matching bookshelves in my daughters' room!
Thanks for sharing!
That is a great little piece. Paint and fabric can do wonders for so many things. I like that you used that combination. I don't do much with DIY home dec myself, but love to see what other creative people have done.
The nightstand came out awesome. It looks like a completely different piece of furniture.
I love it! I have some dressers that I would love to re-do since our master bedroom is entirely mismatched right now. I also have a kid's rocking chair that originally belonged to my great-grandmother, & has been passed down all the way to me. It now belongs to my children, but needs some TLC since I used it so much growing up!
@Marissa – I did a dresser and desk to match. Here is the post: http://wp.me/p3IPNL-3D. I’d like to see your re-do when it’s done. I too have a child’s rocking chair that was mine when I was little, my kids used and now would like to redo for my grandkids – I guess I need to get busy!
This is a brilliant and beautiful way to re-purpose your antique furniture, love it!
This is great, it looks like a completely different piece of furniture. I love the idea of putting fabric on the front of the drawer, it looks so good.
Gorgeous! Absolutely gorgeous! I love the drawer. What a fabulous idea to modge podge on the paper. I love it. It looks completely different and like a brand new piece. You have a gift! Krista @ <a href="http://ahandfulofeverything.blogspot.com"/> A Handful of Everything </a>
Thanks, Krista. It’s amazing how easy it was to turn something boring and old into something trendy.
Very pretty Val! I haven't used mod-podge on furniture yet, but have seen it done and it's another great transformation 🙂
Cindy
Great job! Thank you for linking up with us at the #WWDParty and sharing this great furniture DIY. Have a wonderful weekend!
Great change to an old piece! Came out beautifully and I love the old world fabric.
Oh how I love Mod Podge and paint! Those two paired together make a powerhouse of DIY projects and your antique night stand is a perfect example! It's pretty and fits the budget!
Thanks, it was very hard to let my DD keep it after it was done!